Docker简介
概念
- Docker是一种容器,它被视为存在与一台电脑中的电脑。
- Docker是一种服务,它提供了可被移植的独立容器集合,这些容器会与预先安装的软件包绑定在一起。
安装
下载合适的Docker:https://docs.docker.com/get-docker/
安装Docker
当前使用的是Ubuntu 20.04,请按照以下步骤进行安装:https://docs.docker.com/engine/install/ubuntu/
Install Docker Engine on Ubuntu
Estimated reading time: 10 minutes
To get started with Docker Engine on Ubuntu, make sure you meet the prerequisites, then install Docker.
Prerequisites
OS requirements
To install Docker Engine, you need the 64-bit version of one of these Ubuntu versions:
- Ubuntu Hirsute 21.04
- Ubuntu Groovy 20.10
- Ubuntu Focal 20.04 (LTS)
- Ubuntu Bionic 18.04 (LTS)
- Ubuntu Xenial 16.04 (LTS)
Docker Engine is supported on
x86_64(oramd64),armhf, andarm64architectures.Uninstall old versions
Older versions of Docker were called
docker,docker.io, ordocker-engine. If these are installed, uninstall them:1
$ sudo apt-get remove docker docker-engine docker.io containerd runc
It’s OK if
apt-getreports that none of these packages are installed.The contents of
/var/lib/docker/, including images, containers, volumes, and networks, are preserved. If you do not need to save your existing data, and want to start with a clean installation, refer to the uninstall Docker Engine section at the bottom of this page.Supported storage drivers
Docker Engine on Ubuntu supports
overlay2,aufsandbtrfsstorage drivers.Docker Engine uses the
overlay2storage driver by default. If you need to useaufsinstead, you need to configure it manually. See use the AUFS storage driverInstallation methods
You can install Docker Engine in different ways, depending on your needs:
- Most users set up Docker’s repositories and install from them, for ease of installation and upgrade tasks. This is the recommended approach.
- Some users download the DEB package and install it manually and manage upgrades completely manually. This is useful in situations such as installing Docker on air-gapped systems with no access to the internet.
- In testing and development environments, some users choose to use automated convenience scripts to install Docker.
Install using the repository
Before you install Docker Engine for the first time on a new host machine, you need to set up the Docker repository. Afterward, you can install and update Docker from the repository.
Set up the repository
Update the
aptpackage index and install packages to allowaptto use a repository over HTTPS:1
2
3
4
5
6
7
8$ sudo apt-get update
$ sudo apt-get install \
apt-transport-https \
ca-certificates \
curl \
gnupg \
lsb-releaseAdd Docker’s official GPG key:
1
$ curl -fsSL https://download.docker.com/linux/ubuntu/gpg | sudo gpg --dearmor -o /usr/share/keyrings/docker-archive-keyring.gpg
Use the following command to set up the stable repository. To add the nightly or test repository, add the word
nightlyortest(or both) after the wordstablein the commands below. Learn about nightly and test channels.Note: The
lsb_release -cssub-command below returns the name of your Ubuntu distribution, such asxenial. Sometimes, in a distribution like Linux Mint, you might need to change$(lsb_release -cs)to your parent Ubuntu distribution. For example, if you are usingLinux Mint Tessa, you could usebionic. Docker does not offer any guarantees on untested and unsupported Ubuntu distributions.- x86_64 / amd64
- armhf
- arm64
1
2
3
$ echo \
"deb [arch=amd64 signed-by=/usr/share/keyrings/docker-archive-keyring.gpg] https://download.docker.com/linux/ubuntu \
$(lsb_release -cs) stable" | sudo tee /etc/apt/sources.list.d/docker.list > /dev/null
Install Docker Engine
Update the
aptpackage index, and install the latest version of Docker Engine and containerd, or go to the next step to install a specific version:1
2$ sudo apt-get update
$ sudo apt-get install docker-ce docker-ce-cli containerd.ioGot multiple Docker repositories?
If you have multiple Docker repositories enabled, installing or updating without specifying a version in the
apt-get installorapt-get updatecommand always installs the highest possible version, which may not be appropriate for your stability needs.To install a specific version of Docker Engine, list the available versions in the repo, then select and install:
a. List the versions available in your repo:
1
2
3
4
5
6$ apt-cache madison docker-ce
docker-ce | 5:18.09.1~3-0~ubuntu-xenial | https://download.docker.com/linux/ubuntu xenial/stable amd64 Packages
docker-ce | 5:18.09.0~3-0~ubuntu-xenial | https://download.docker.com/linux/ubuntu xenial/stable amd64 Packages
docker-ce | 18.06.1~ce~3-0~ubuntu | https://download.docker.com/linux/ubuntu xenial/stable amd64 Packages
docker-ce | 18.06.0~ce~3-0~ubuntu | https://download.docker.com/linux/ubuntu xenial/stable amd64 Packagesb. Install a specific version using the version string from the second column, for example,
5:18.09.1~3-0~ubuntu-xenial.1
$ sudo apt-get install docker-ce=<VERSION_STRING> docker-ce-cli=<VERSION_STRING> containerd.io
Verify that Docker Engine is installed correctly by running the
hello-worldimage.1
$ sudo docker run hello-world
This command downloads a test image and runs it in a container. When the container runs, it prints an informational message and exits.
Docker Engine is installed and running. The
dockergroup is created but no users are added to it. You need to usesudoto run Docker commands. Continue to Linux postinstall to allow non-privileged users to run Docker commands and for other optional configuration steps.Upgrade Docker Engine
To upgrade Docker Engine, first run
sudo apt-get update, then follow the installation instructions, choosing the new version you want to install.Install from a package
If you cannot use Docker’s repository to install Docker Engine, you can download the
.debfile for your release and install it manually. You need to download a new file each time you want to upgrade Docker.Go to
https://download.docker.com/linux/ubuntu/dists/, choose your Ubuntu version, then browse topool/stable/, chooseamd64,armhf, orarm64, and download the.debfile for the Docker Engine version you want to install.Note: To install a nightly or test (pre-release) package, change the word
stablein the above URL tonightlyortest. Learn about nightly and test channels.Install Docker Engine, changing the path below to the path where you downloaded the Docker package.
1
$ sudo dpkg -i /path/to/package.deb
The Docker daemon starts automatically.
Verify that Docker Engine is installed correctly by running the
hello-worldimage.1
$ sudo docker run hello-world
This command downloads a test image and runs it in a container. When the container runs, it prints an informational message and exits.
Docker Engine is installed and running. The
dockergroup is created but no users are added to it. You need to usesudoto run Docker commands. Continue to Post-installation steps for Linux to allow non-privileged users to run Docker commands and for other optional configuration steps.Upgrade Docker Engine
To upgrade Docker Engine, download the newer package file and repeat the installation procedure, pointing to the new file.
Install using the convenience script
Docker provides convenience scripts at get.docker.com and test.docker.com for installing edge and testing versions of Docker Engine - Community into development environments quickly and non-interactively. The source code for the scripts is in the
docker-installrepository. Using these scripts is not recommended for production environments, and you should understand the potential risks before you use them:- The scripts require
rootorsudoprivileges to run. Therefore, you should carefully examine and audit the scripts before running them. - The scripts attempt to detect your Linux distribution and version and configure your package management system for you. In addition, the scripts do not allow you to customize any installation parameters. This may lead to an unsupported configuration, either from Docker’s point of view or from your own organization’s guidelines and standards.
- The scripts install all dependencies and recommendations of the package manager without asking for confirmation. This may install a large number of packages, depending on the current configuration of your host machine.
- The script does not provide options to specify which version of Docker to install, and installs the latest version that is released in the “edge” channel.
- Do not use the convenience script if Docker has already been installed on the host machine using another mechanism.
This example uses the script at get.docker.com to install the latest release of Docker Engine - Community on Linux. To install the latest testing version, use test.docker.com instead. In each of the commands below, replace each occurrence of
getwithtest.Warning:
Always examine scripts downloaded from the internet before running them locally.
1
2
3
$ curl -fsSL https://get.docker.com -o get-docker.sh
$ sudo sh get-docker.sh
<...>If you would like to use Docker as a non-root user please see the post-installation steps for Linux.
Docker Engine - Community is installed. It starts automatically on
DEB-based distributions. OnRPM-based distributions, you need to start it manually using the appropriatesystemctlorservicecommand. As the message indicates, non-root users can’t run Docker commands by default.Upgrade Docker after using the convenience script
If you installed Docker using the convenience script, you should upgrade Docker using your package manager directly. There is no advantage to re-running the convenience script, and it can cause issues if it attempts to re-add repositories which have already been added to the host machine.
Uninstall Docker Engine
Uninstall the Docker Engine, CLI, and Containerd packages:
1
$ sudo apt-get purge docker-ce docker-ce-cli containerd.io
Images, containers, volumes, or customized configuration files on your host are not automatically removed. To delete all images, containers, and volumes:
1
2
$ sudo rm -rf /var/lib/docker
$ sudo rm -rf /var/lib/containerd
You must delete any edited configuration files manually.
在Docker中运行ROS2和Gazebo
可视化Docker容器
新开一个terminal,创建一个文件夹
mkdir new_foldre下载docker容器镜像
sudo docker pull tiryoh/ros2-desktop-vnc:foxy运行该容器
sudo docker run -it -p 6080:80 -e RESOLUTION=1920*1080 -v /new_folder --name ros2_new_folder mwf/ros2-gazebo-turtlebot3-desktop-vnc:foxyros2_new_folder是容器名,我们将新建的new_folder绑定到容器上(暂时没明白)
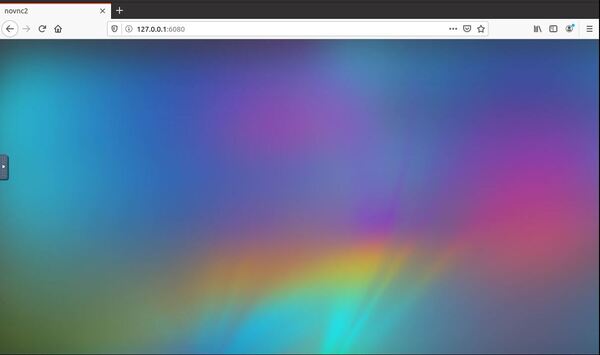
在浏览器中输入: http://127.0.0.1:6080/,显示如下
在这个过程中,开始一直出现无法ping通127.0.0.1:6080的现象,因此也无法在浏览器页面可视化该docker容器。经过一番折腾,发现是因为启动了代理的原因,关闭代理,重启系统,就可以了。
在docker中安装TurtleBot3
方法一
新开一个terminal,输入以下指令(此时上文的容器尚处在运行状态)
sudo docker ps -l查看运行容器的id号

输入以下指令,进入容器
sudo docker exec -it bea80322e123 /bin/bash
表示已经成功
按以下步骤安装TurtulBot3的源码包
mkdir -p ~/turtlebot3_ws/srccd ~/turtlebot3_wswget https://raw.githubusercontent.com/ROBOTIS-GIT/turtlebot3/ros2/turtlebot3.reposwget这一步尽量在代理下完成,国内的话会下载失败
vcs import src < turtlebot3.repos切换到foxy-devel分支,如果按照默认的最新分支,会出现编译失败的问题(【1】)
vcs custom --args checkout foxy-devel编译
colcon build --symlink-install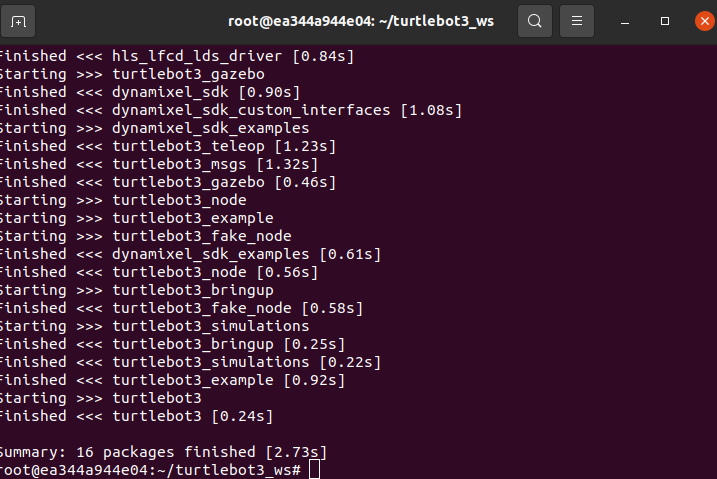
设置环境变量
echo 'source ~/turtlebot3_ws/install/setup.bash' >> ~/.bashrcecho 'export GAZEBO_MODEL_PATH=$GAZEBO_MODEL_PATH:~/turtlebot3_ws/src/turtlebot3/turtlebot3_simulations/turtlebot3_gazebo/models' >> ~/.bashrcecho 'export TURTLEBOT3_MODEL=waffle_pi' >> ~/.bashrcsource ~/.bashrc
方法二
新开命令行窗口,输入
sudo docker run -it -p 6080:80 -e RESOLUTION=1920*1080 -v /new_folder --name ros2_new_folder mwf/ros2-gazebo-turtlebot3-desktop-vnc:foxy浏览器中(一步是chrome)打开 http://127.0.0.1:6080/
在可视化窗口中,点击左下角的菜单System Tools->LXTerminal
在LXTerminal中输入以下命令
下载
mkdir -p ~/turtlebot3_ws/srccd ~/turtlebot3_wswget https://raw.githubusercontent.com/ROBOTIS-GIT/turtlebot3/ros2/turtlebot3.reposwget这一步尽量在代理下完成,国内的话会下载失败
vcs import src < turtlebot3.repos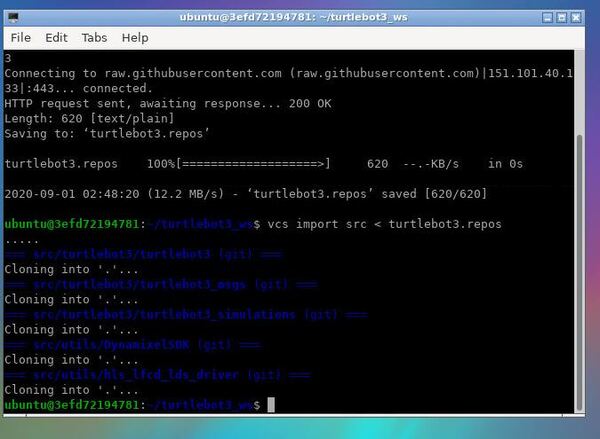
切换到foxy-devel分支,如果按照默认的最新分支,会出现编译失败的问题(见【1】)
vcs custom --args checkout foxy-devel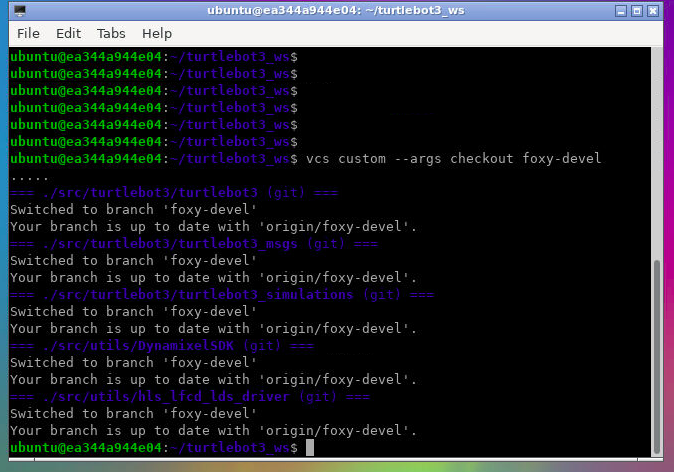
编译
colcon build --symlink-install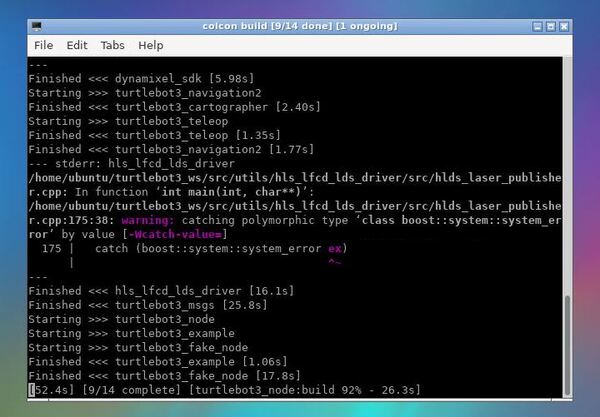
设置环境变量
echo 'source ~/turtlebot3_ws/install/setup.bash' >> ~/.bashrcecho 'export GAZEBO_MODEL_PATH=$GAZEBO_MODEL_PATH:~/turtlebot3_ws/src/turtlebot3/turtlebot3_simulations/turtlebot3_gazebo/models' >> ~/.bashrcecho 'export TURTLEBOT3_MODEL=waffle_pi' >> ~/.bashrcsource ~/.bashrc
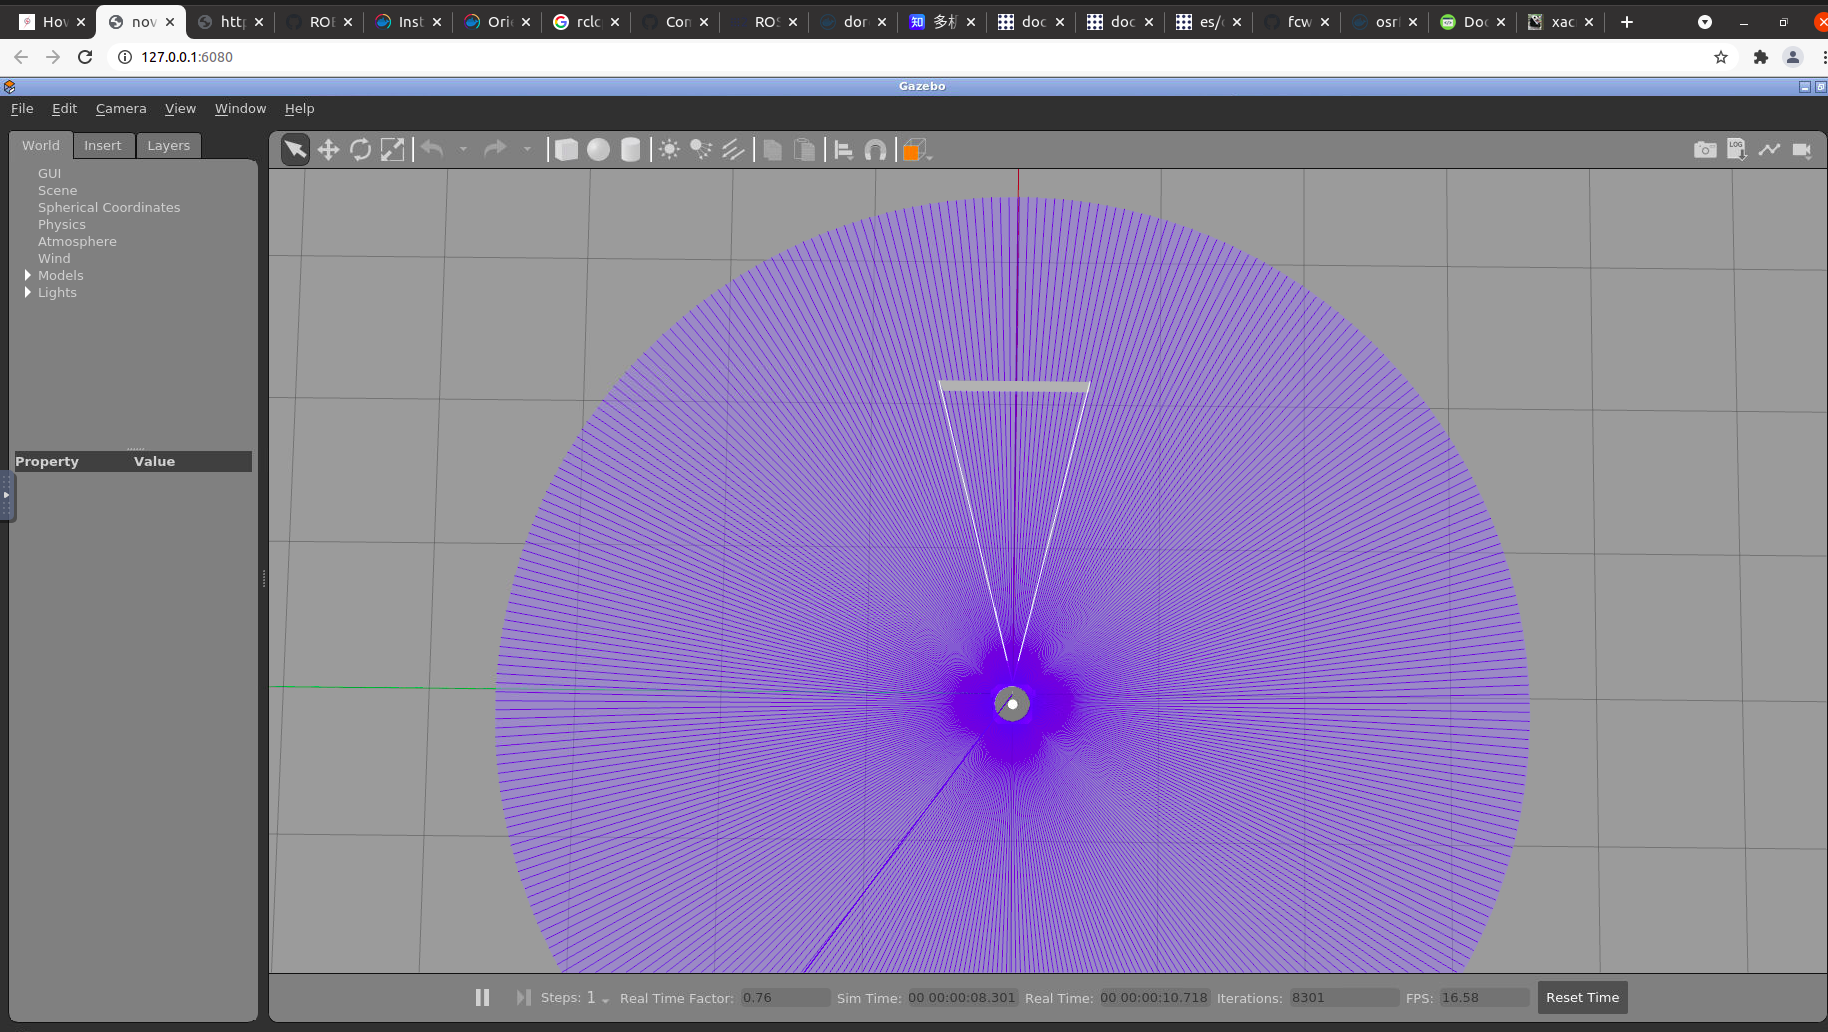
启动一个Empty World
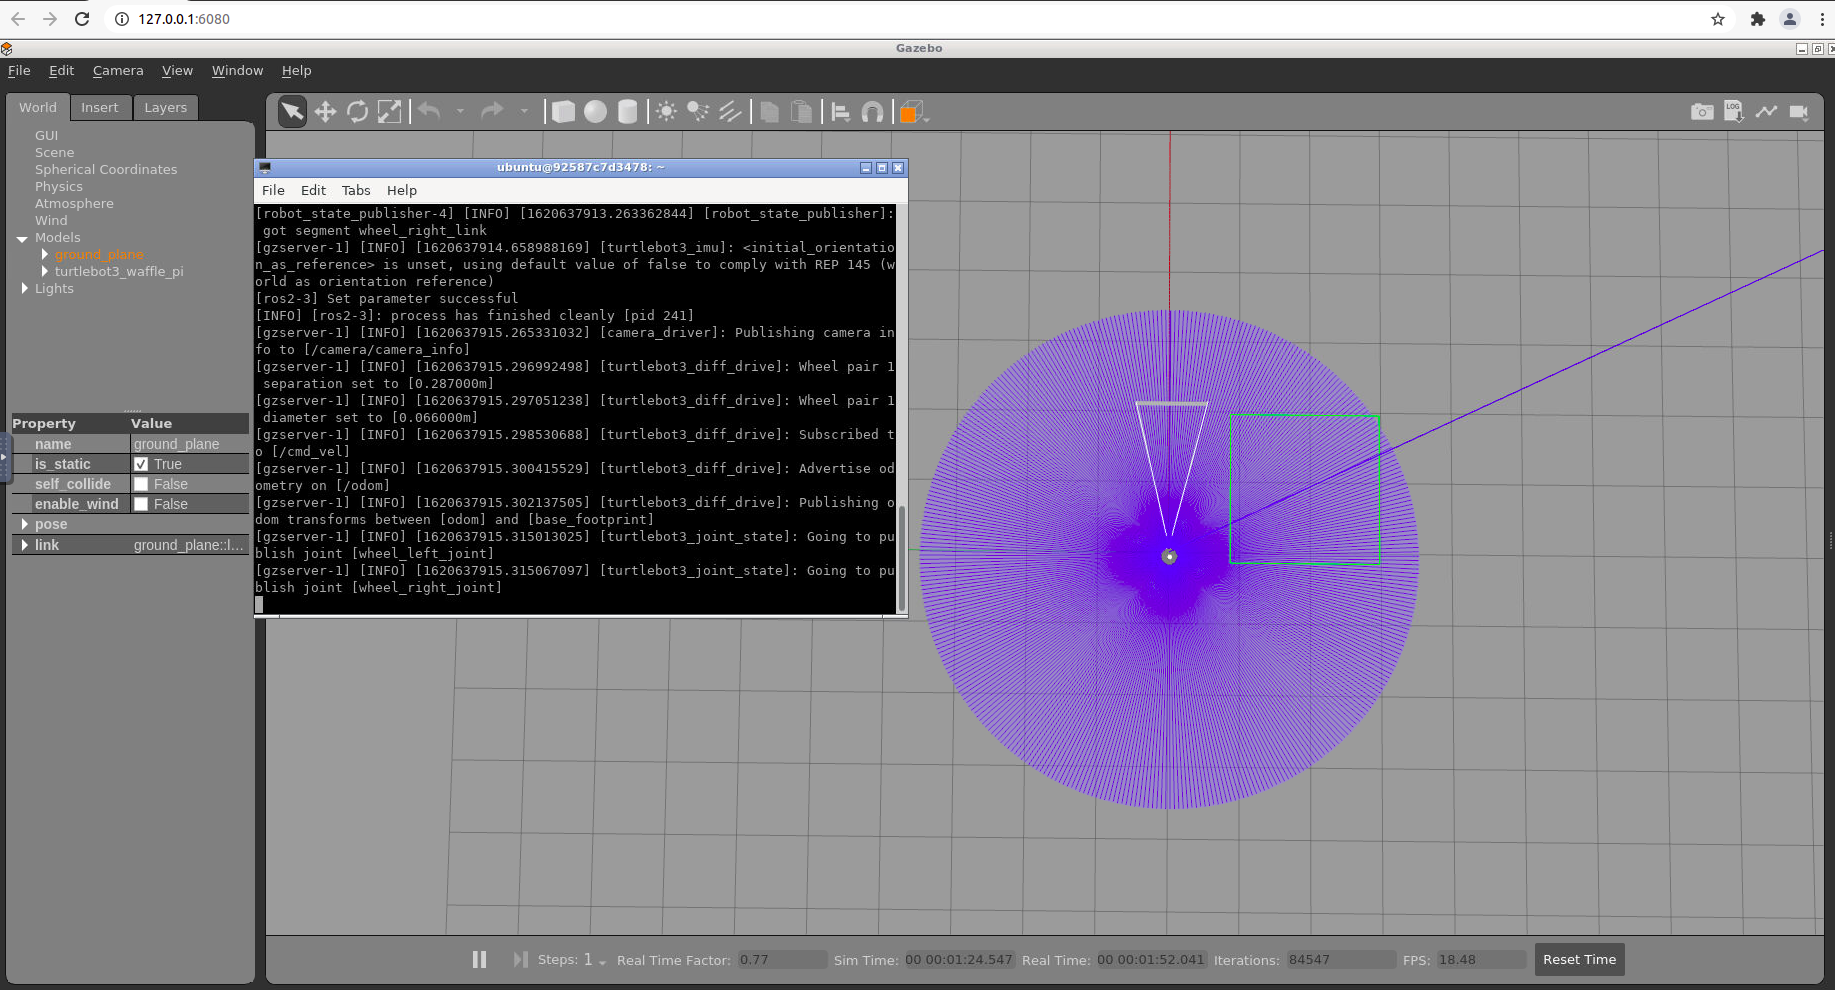
在浏览器的可视化界面中新开一个LXTerminal,输入
ros2 launch turtlebot3_gazebo empty_world.launch.py等待一会(也可能几分钟),便可见如下的界面
附
【1】下载的turtlebot3源码,如果不切换到foxy-devel分支,编译时会一直报如下错误
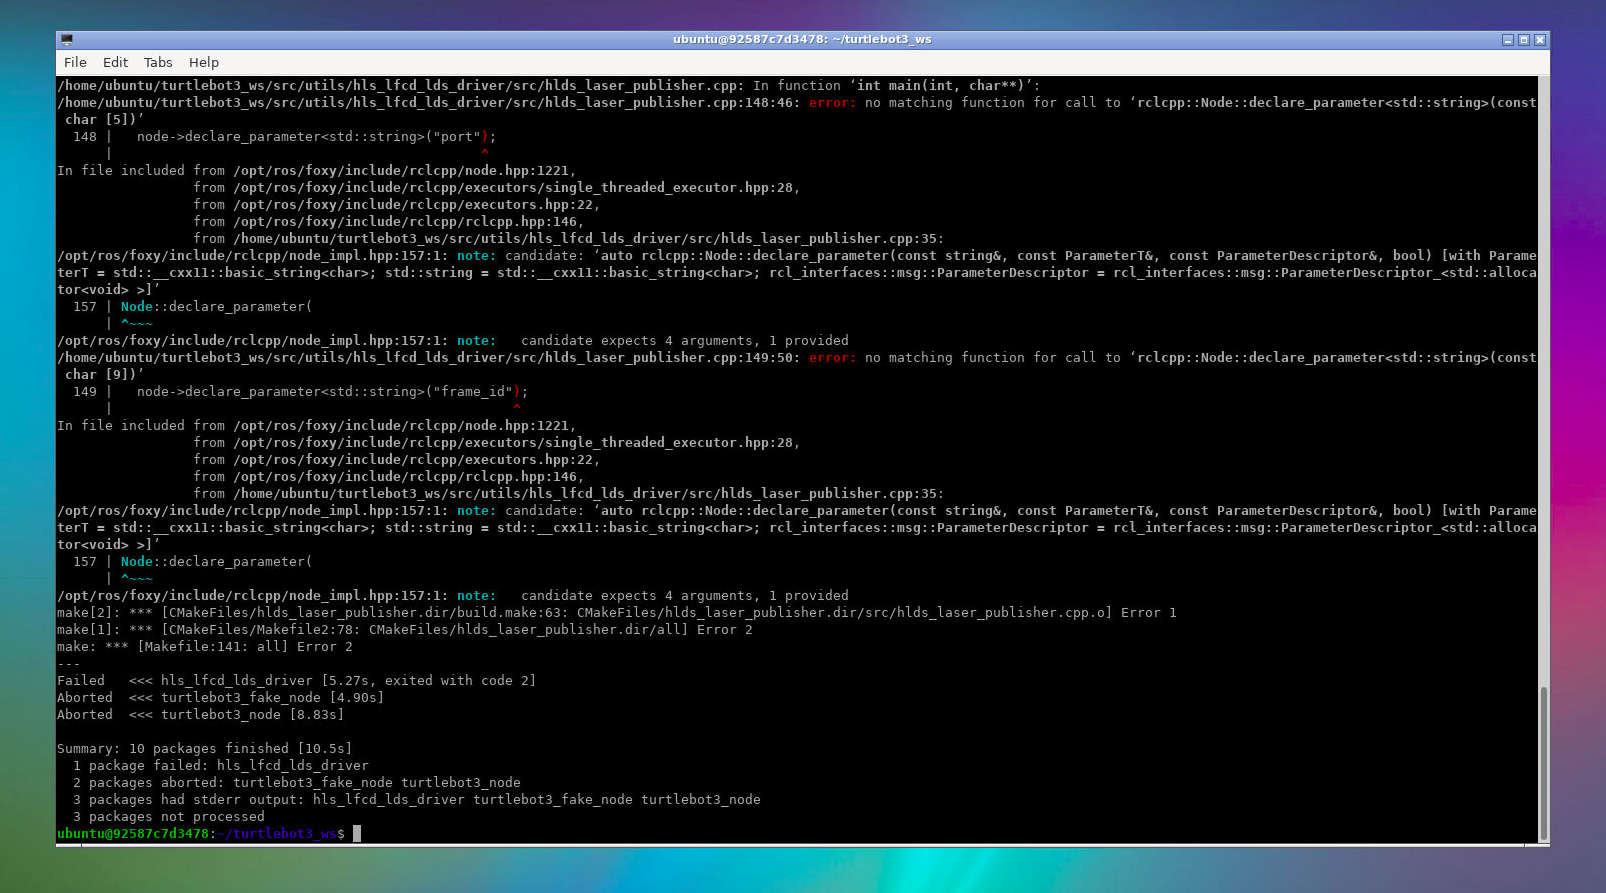
原因参考https://github.com/ROBOTIS-GIT/hls_lfcd_lds_driver/issues/65
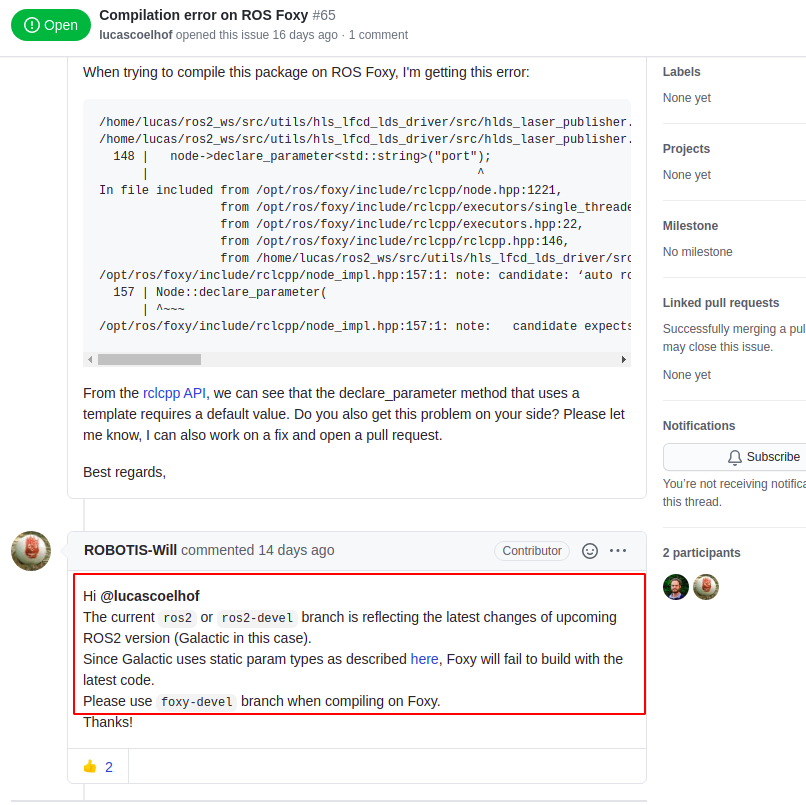
意思是最新的代码使用的是upcoming ROS2 version(即将发布的版本)的语法,在foxy的编译系统中,无法编译通过,需要将代码切换到与foxy-devel分支相对应的分支,才能在foxy的编译系统中通过
具体的语法参考下文
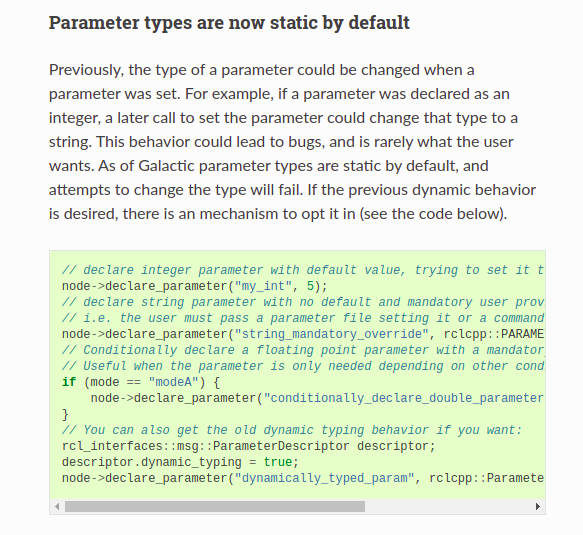
获取更多细节,参考https://github.com/ros2/rclcpp/blob/master/rclcpp/doc/notes_on_statically_typed_parameters.md